Step-By-Step Guide to Creating Your First Webpage

Here, we're going to guide you through creating your very first webpage!

We're going to do this in the following steps:

  • Add a Page Title
  • Set Page Colors
  • Add some Text
  • Add a Link
  • Add an Image
  • Add a simple List
    ...after each step click the "Preview File(s)" button to see how the page is developing

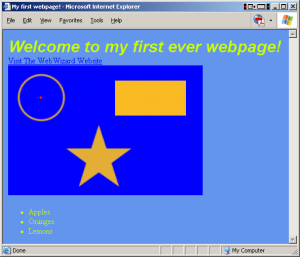
    Our finished page is going to look something like this:

    Step 1 - Add Page Title 1. Click the (Add Page Title) icon
    2. In the window that opens, enter "My first webpage!"
    3. Click OK. The window will close, and the HTML code for our title will be added to the Editor window
    Step 2 - Set Page Colors 1. Click the (Default Page Settings) icon
    2. In the window that opens, click the box for "Background Color" (By default, a white box containing the text "#FFFFFF")
    3. The "ColorPicker" will open.
    4. Select "Cornflower Blue" from the drop-down list of [Preset Colors]
    5. Click OK. The "ColorPicker" will now close, updating the color of the "Background Color" box
    6. Do the same to change the "Default Font Color", but instead of using a [Preset Color], click the bottom-left most color in the "color grid" (a greeny-yellow color) 7. Click OK. The "ColorPicker" will now close, updating the color of the "Default Font Color" box
    7. Click OK. The window will close, and the HTML code for our colors will be added to the Editor window
    Step 3 - Add some Text 1. Click the (Insert Text) icon
    2. In the window that opens, change the text "Enter Text Here" to read "Welcome to my first ever webpage!"
    3. In the "Font" drop-down list, select "Arial", and enter a "Size" of "24 points"
    4. Check (tick) the "Bold" and "Italic" boxes to the right of the window
    5. Click OK. The window will close, and the HTML code for our text will be added to the Editor window
    Step 4 - Add a Link 1. Click the (New Line) icon. This tells the WebWIzard that we want to place our link on a new line (and not on the same line as the text we entered in the previous step!)
    2. Click the (Insert Link) icon
    3. In the window that opens, enter "http://www.the-webwizard.co.uk/" in the "Link To" field
    4. Enter "Visit The WebWizard's Website" in the "Link Content" field
    5. Click OK. The window will close, and the HTML code for our link will be added to the Editor window
    Step 5 - Add a Image 1. Click the (New Line) icon to start a new line
    2. Click the (Insert Image) icon
    3. In the window that opens, enter "maptut.gif" in the "Image Location" field
    4. (Optional) Click the "Preview" button to the right of this field to see a small preview of the "maptut.gif" image
    5. Click OK. The window will close, and the HTML code for our image will be added to the Editor window
    Step 6 - Add a Simple List 1. Click the (New Line) icon to start a new line
    2. Click the (Insert List) icon
    3. In the window that opens, enter the following items (one per line) in the "List Data" field: "Apples", "Oranges", "Lemons"
    4. Click OK. The window will close, and the HTML code for our list will be added to the Editor window

    ..and that's our very first webpage created! - Click the "Preview File(s)" button to view the finished page!

    The Generated HTML Code for our first page:

    <HTML>
    <HEAD>
    <TITLE>My first webpage!</TITLE>
    <STYLE> BODY { background-color:#6495ED; color:#CCFF00 }
    </STYLE>
    </HEAD>
    <BODY>
    <SPAN STYLE="font-family:Arial, sans-serif; font-size:24pt; font-weight:bold; font-style:italic">Welcome to my first ever webpage!</SPAN>
    <br>
    <A HREF="http://www.the-webwizard.co.uk/">Visit The WebWizard Website</A>
    <BR>
    <IMG SRC="maptut.gif" WIDTH=384 HEIGHT=256>
    <BR>
    <UL>
    <LI> Apples
    <LI> Oranges
    <LI> Lemons
    </UL>

    Next Topic: Toolbar Buttons >